 |
| My blue rose headband |
I have an obsession for roses, especially blue ones. It came from watching a very old movie (which i don't remember the title) when i was little. The movie is a fantasy adventure. The main hero is sent by a wizard to find a blue rose to be able to save his love from dying. He goes through many adventures, finds the blue rose, however, looses it on his way home. Thinking his love is going to die, he goes to see her for the last time. But there is a white flower in the vase, when he holds it, it turns blue showing his true love for her. Sappy, i know. But as a kid, after watching that movie, i started to go around, trying to find a blue rose. Never find it, no surprise. Well, if i can't find it, why not make it? So i did. And here it is, step by step of making a ribbon rose so you can make your own color roses. Samples of the roses below:
What you need
 |
| Ribbon, matching thread, needle, scissor and a lighter |
One spool of ribbon with the color of your choice. For the smaller roses, such as the one on the headband, i use 3/8" ribbon. This is the smallest ribbon size i would go with. It gets harder to hold on to the rose if the ribbon is too skinny. For the bigger blue rose in the above photo, i use a 1.5" ribbon. I recommend satin ribbon over gross-grained ribbon because i think the satin rose seems to "flow" better and more beautiful.
I use candle to sealed off the ends of the ribbon. It gives me more ease and control over the lighter, and it makes my house smells great!
Hot glue gun for gluing the roses to the headband. Not necessary for just making the roses.
What to do
Sealed off the end of the ribbon
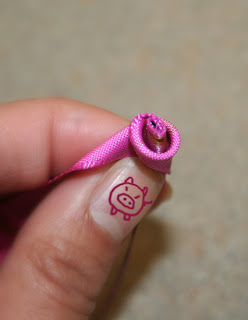
Roll up the end of the ribbon (about 4 to 5 times or until you can't see the end anymore), secure with thread.
Fold the ribbon back away from you to create a right triangle
Roll the side up toward the corner of the triangle, make sure to not pull it too tight. You need to keep it a little loose for the rose to form.
Secure the bottom with thread
Repeat the process, fold the ribbon back away from you
Then roll the rose again toward the corner of the triangle. Notice how i keep the rose a little loose?
Secure the bottom
Repeat the same process until you have the rose at the size that you like, then cut the ribbon off with enough length to fold it back at the bottom.
Sealed off the end
Fold the end over at the bottom of the rose, secure with thread.
And you have a rose!! Don't worry if your rose doesn't look the same. Every rose will comes out a little different. After all, that is what makes it unique!
Here is what the back looks like
My rose now join its friends
Now come the headband
You need roses and a headband. You can use as many roses as you want. I use 5 on mine. For the headband, i bought my plastic ones at the 99 cent store. The metal one i bought online.
Don't forget your glue gun. Remember to put a piece of scrap paper underneath if you don't want glue on your work area. Set the glue gun on high.
Wait until the glue gun is really hot. The hotter the temperature, the more permanent your glue will be. And try not to burn your hand! Squeeze a drop on the back of the rose
Stick it on the headband, wherever you like. Repeat the same with the other roses.
And here we go. You have a finished headband
You can also glue your roses on bobby pins, or alligator clips. The alligator clips make great presents if you have little girls.
Some samples of how i use roses in my jewelries
 |
| http://www.etsy.com/listing/57537920/free-shipping-within-us-handmade-mystery |
 |
| http://www.etsy.com/listing/58868920/free-shipping-within-us-handmade-rose |


Adorable! Can't wait to try this! You are so talented. Do you have an Etsy store? if not, you should :)
ReplyDeletexo
Candice
Do you know approximately how many inches of ribbon you used to make the large flower in the first picture? These are exactly what I want to use for my wedding. They're beautiful. :)
ReplyDeleteSawyerlove - the large flower is made from 1.5" satin ribbon. The length of the ribbon for each flower is approximately 20". It can be shorter or longer depends on how big you want your flower to be. I hope it helps, and congrats on your upcoming wedding. :)
ReplyDelete